Through the multitude of router firmware projects I found Tomato Firmware (Shibby Mod) as being the best one for my case (I am using it for OpenVPN server, PPTP server, Dynamic DNS, port forwarding, Quality Of Service … ). This article will describe step by step how you can configure a VPN site 2 site between on-premise and Microsoft Azure using your consumer based wireless router. The step by step details will be based on the Tomato Shibby Mod, but almost the same steps can be performed on TomatoUSB Mod (Teddy Bear), AdvancedTomato GUI Mod, DD-WRT, OpenWrt … – all are Linux-based and the main requirements are:
- your router to support one of these firmware’s
- be able to install strongSwan on top of it
Just for understanding – according with TomatoAnon (who covers only a tiny part of the available Tomato based routers) there are +35.000 such devices in use. Most likely combined with all the other DD-WRT, OpenWrt routers we probably get to couple of millions devices who with a bit of adjustments are capable to establish site 2 site VPN with Azure.
Microsoft doesn’t has strongSwan on its list of validated VPN devices. Openswan and strongSwan are FreeS/WAN forks. At the moment of writing this article, Openswan is marked on the Microsoft validated VPN device list as “coming soon”. Even if stongSwan is not yet on the official list of validated VPN devices, the fact Microsoft is taking in consideration Openswan is an indication the strongSwan will also be there at some point. More than that Microsoft is providing the VPN specifications for the VPN site 2 site tunnel to work also with “not yet validated VPN devices” (the discontinued Microsoft Thread Management Gateway is also in this category). Your connection will be OK as long as those specifications are meet, but you will not be able to benefit from the Microsoft support in such setup.
The good thing for the IT PROs who want to configure a site 2 site VPN between on-premises and Microsoft Azure is such setup is possible using the consumer based wireless routers. In fact this type of setup (Tomato Shibby Mod + Entware-ng + strongSwan) is supporting both types of VPN Azure Gateways (static and dynamic) – which is really appreciable taking in consideration some top end devices like Cisco ASA, Palo Altos, Watchguard, F5 are not capable to handle the Azure dynamic gateway. This article will not mention the differences between the Azure static and dynamic gateways, but always try to use a dynamic gateway because it gives you extra functionality and flexibility (read more about Azure static vs dynamic gateways here and here).
This article is split in four parts:
- Install and configure Entware-ng + strongSwan on your router
- Configure and perform the site-2-site VPN using Azure dynamic gateway
- Configure and perform the site-2-site VPN using Azure static gateway
- Troubleshooting Azure site-2-site VPN and strongSwan
Install Entware-ng on your router
The main target is to install strongSwan on the router, but in order to install strongSwan we need first to install Entware-ng. Entware-ng is a package manager and software repository for embedded systems who allows you to easily extend your router capabilities (there are about 1800 additional packages available).
This is the USB flash drive who will be used to host the Entware-ng and strongSwan.
It is not really necessary to use a USB flash drive. The Entware-ng and strongSwan installation can be performed also on Micro-SD cards – as long as your router has such interface available (my router does, but for the purpose of this step-by-step article I will use an USB flash drive).

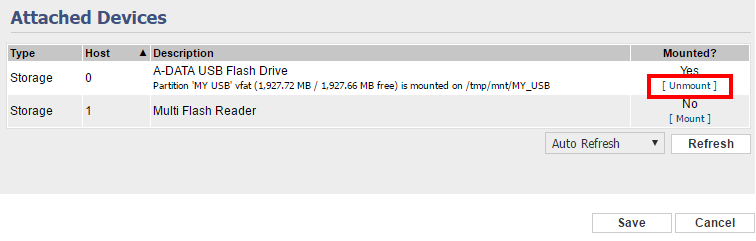
This is the USB flash drive initial status. Please make sure to not keep any files on the flash drive because as part of the Entware-ng installation is necessary to format it.

Plug the USB flash drive into your router.
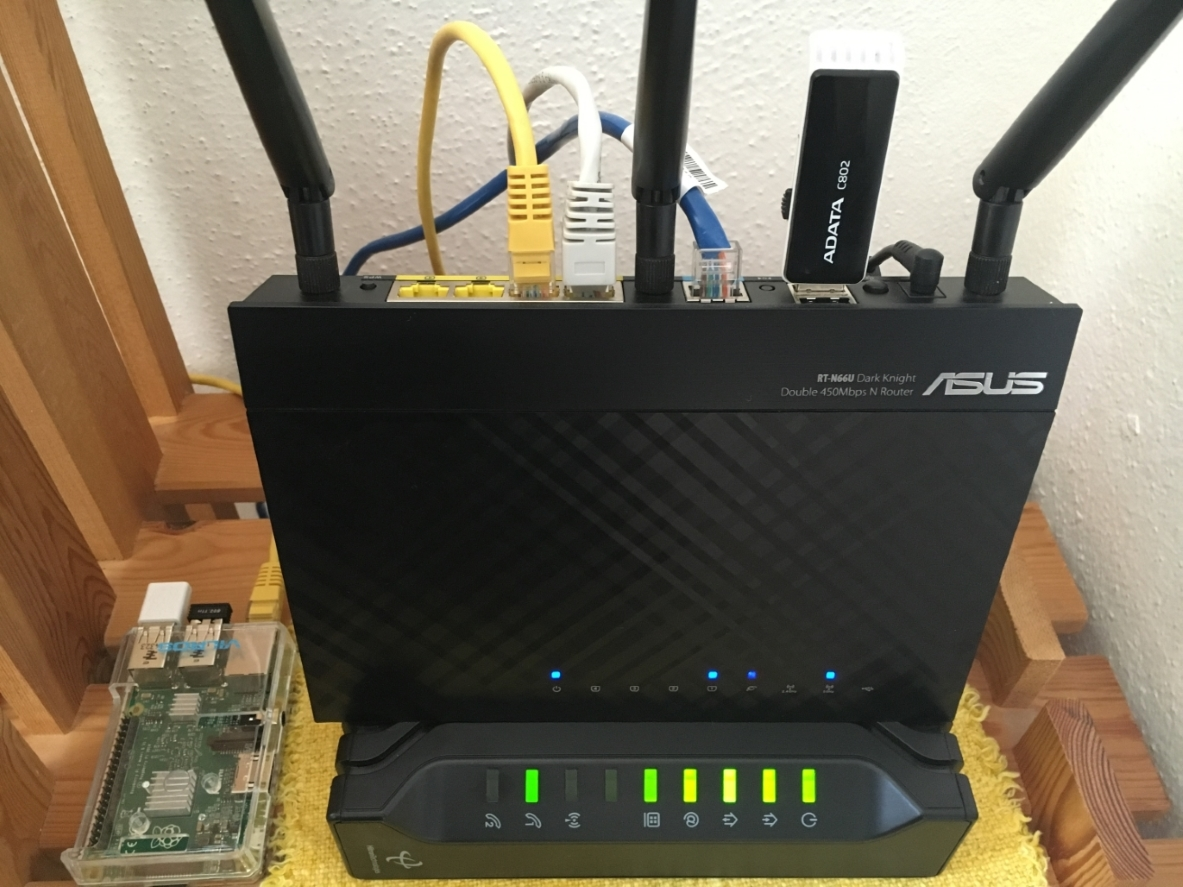
Connect to your router management interface and make sure you enable the USB support.
 Make sure the “Run after mounting” and “Run before unmounting” sections contains the following command lines.
Run after mounting
#!/bin/sh
/opt/etc/init.d/rc.unslung start
Run before unmounting
#!/bin/sh
/opt/etc/init.d/rc.unslung stop
sleep 15
umount /opt
After pressing the Save button, the new settings will be applied and the USB device will be recognized.
Make sure you unmount the USB device before proceeding to the next step.
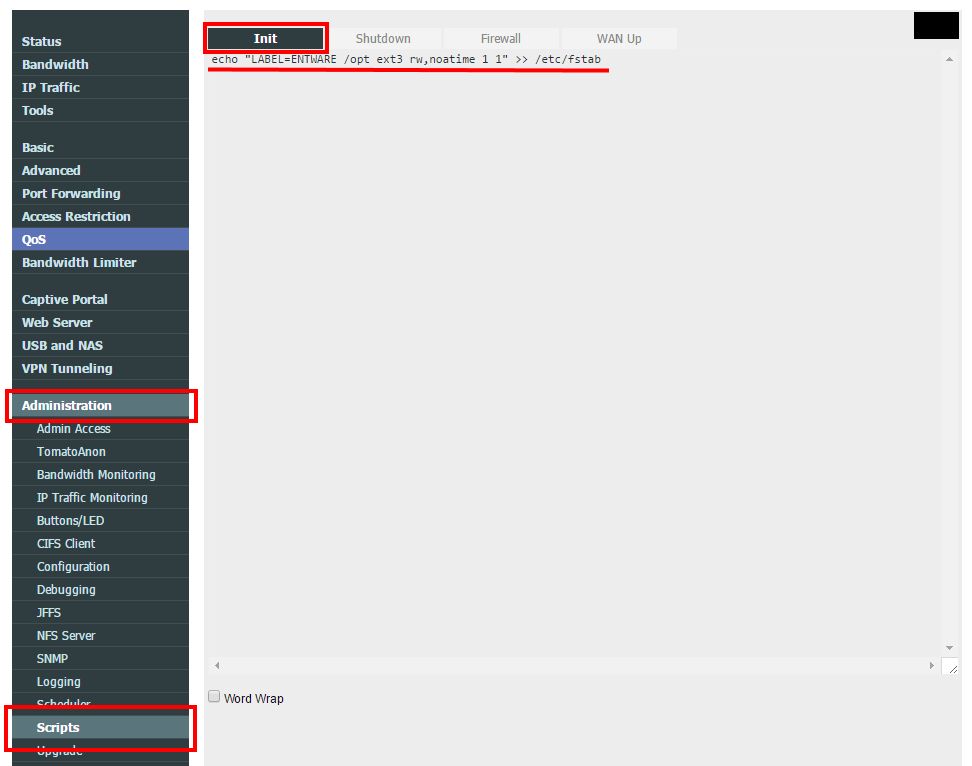
In the Administration -> Scripts -> Init section will be necessary to add the following command line to be executed when the router starts.
echo "LABEL=ENTWARE /opt ext3 rw,noatime 1 1" >> /etc/fstab
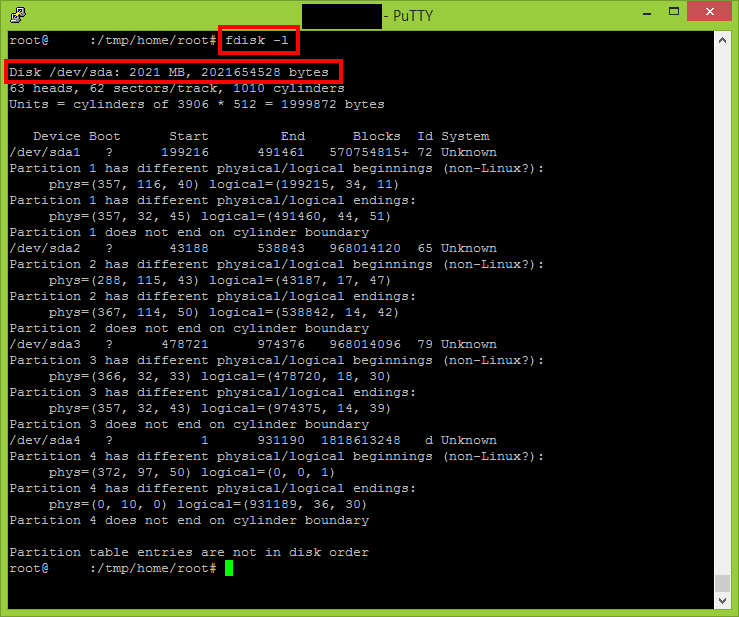
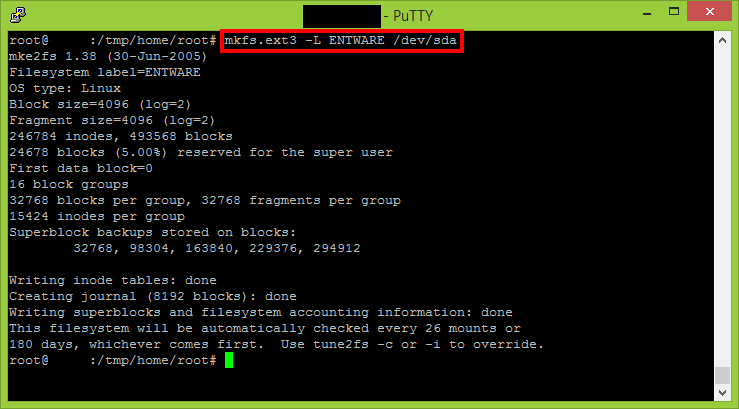
It is time to format the USB flash drive and make it ext3.
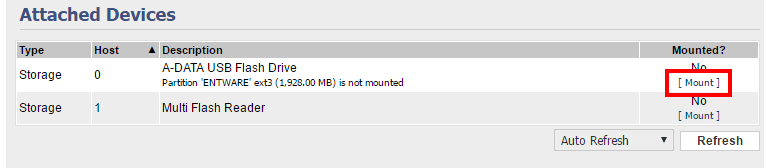
Mount the newly created partition. The Entware-ng installer will require the /opt to be mounted.

After the /opt is mounted, the Entware-ng installation will be triggered using the following command.
wget -O - http://pkg.entware.net/binaries/mipsel/installer/installer.sh | sh
Please note my router is a MIPS CPU based router. In case yours is ARM you will need to use another command.
wget -O - http://pkg.entware.net/binaries/armv7/installer/entware_install.sh | sh
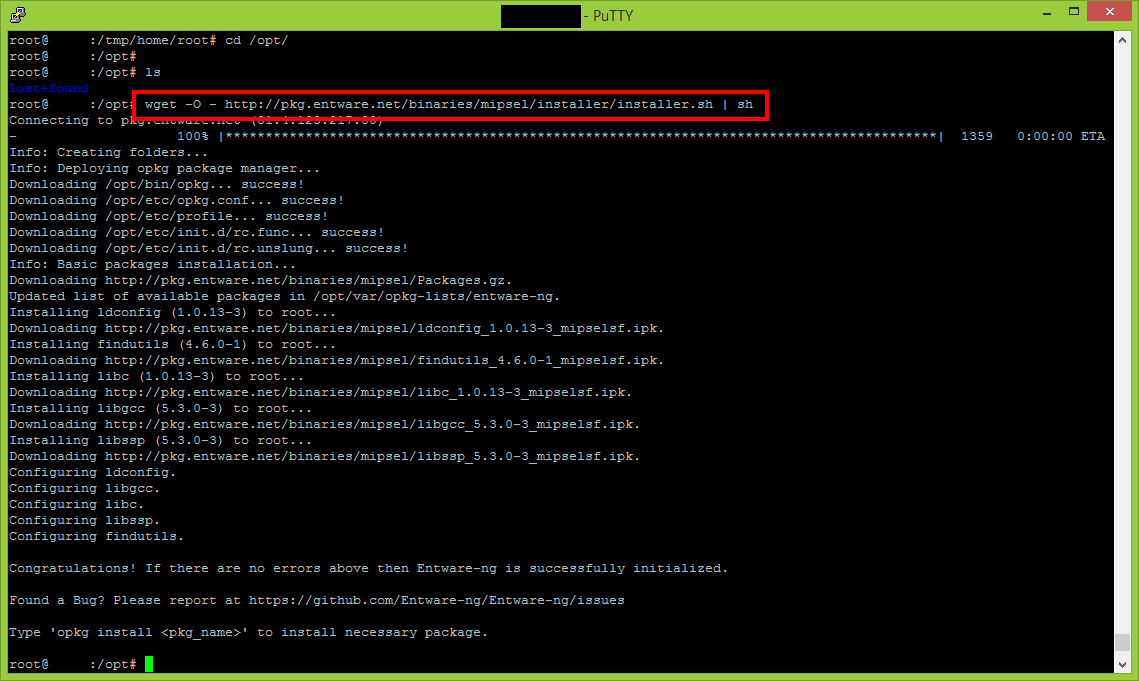
This is a very good moment to restart your router because it will validate if the init & automount scripts are running correctly and Entware-ng installation completed successfully.
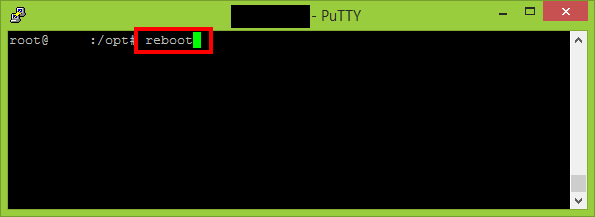
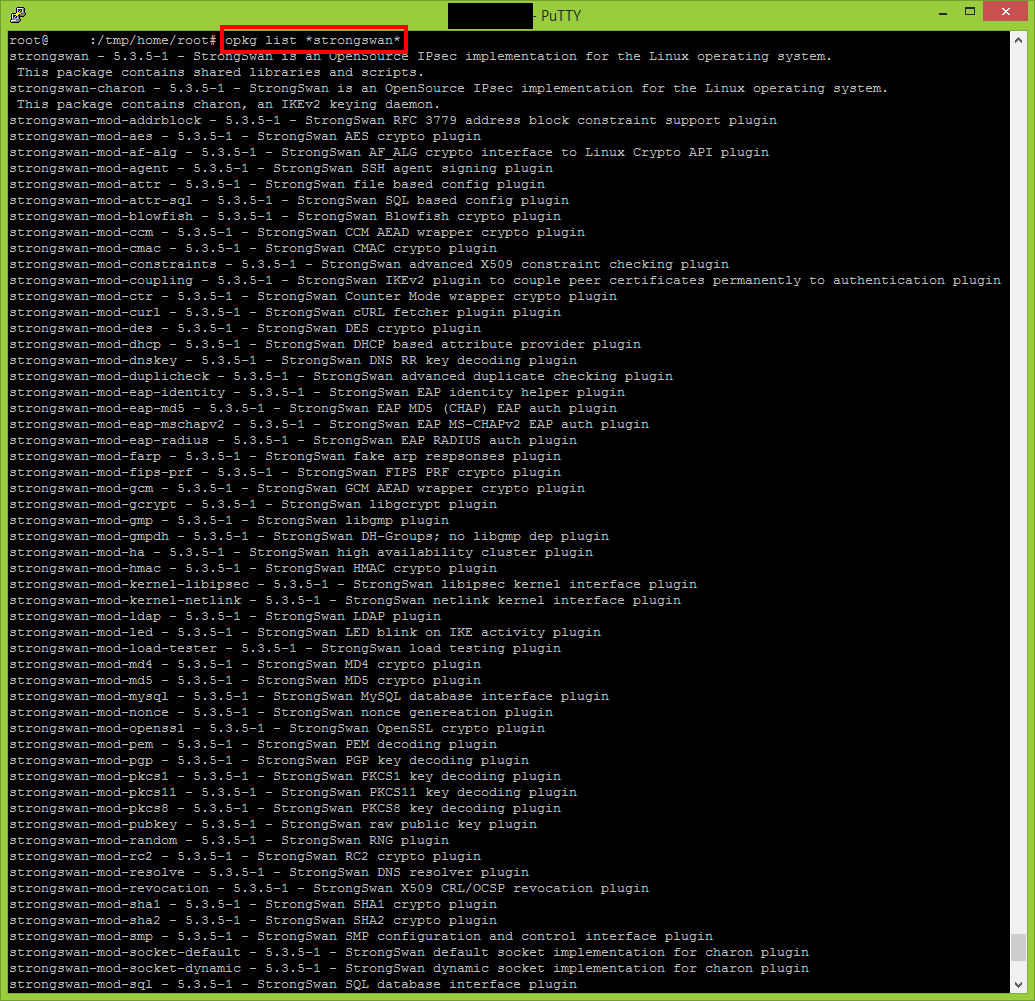
After the reboot verify if the following command is returning a valid response.
opkg list *strongswan*
Install strongSwan on your router
Execute the following commands to perform a full installation of strongSwan.
opkg install strongswan strongswan-charon strongswan-mod-addrblock strongswan-mod-aes strongswan-mod-af-alg strongswan-mod-agent strongswan-mod-attr strongswan-mod-attr-sql strongswan-mod-blowfish strongswan-mod-ccm strongswan-mod-cmac strongswan-mod-constraints strongswan-mod-coupling strongswan-mod-ctr strongswan-mod-curl strongswan-mod-des strongswan-mod-dhcp
opkg install strongswan-mod-dnskey strongswan-mod-duplicheck strongswan-mod-eap-identity strongswan-mod-eap-md5 strongswan-mod-eap-mschapv2 strongswan-mod-eap-radius strongswan-mod-farp strongswan-mod-fips-prf strongswan-mod-gcm strongswan-mod-gcrypt strongswan-mod-gmp strongswan-mod-gmpdh strongswan-mod-ha strongswan-mod-hmac strongswan-mod-kernel-libipsec
opkg install strongswan-mod-kernel-netlink strongswan-mod-ldap strongswan-mod-led strongswan-mod-load-tester strongswan-mod-md4 strongswan-mod-md5 strongswan-mod-mysql strongswan-mod-nonce strongswan-mod-openssl strongswan-mod-pem strongswan-mod-pgp strongswan-mod-pkcs1 strongswan-mod-pkcs11 strongswan-mod-pkcs8 strongswan-mod-pubkey strongswan-mod-random
opkg install strongswan-mod-rc2 strongswan-mod-resolve strongswan-mod-revocation strongswan-mod-sha1 strongswan-mod-sha2 strongswan-mod-smp strongswan-mod-socket-default strongswan-mod-socket-dynamic strongswan-mod-sql strongswan-mod-sqlite strongswan-mod-sshkey strongswan-mod-stroke strongswan-mod-test-vectors strongswan-mod-unity strongswan-mod-updown strongswan-mod-whitelist
opkg install strongswan-mod-x509 strongswan-mod-xauth-eap strongswan-mod-xauth-generic strongswan-mod-xcbc strongswan-utils
Configure strongSwan
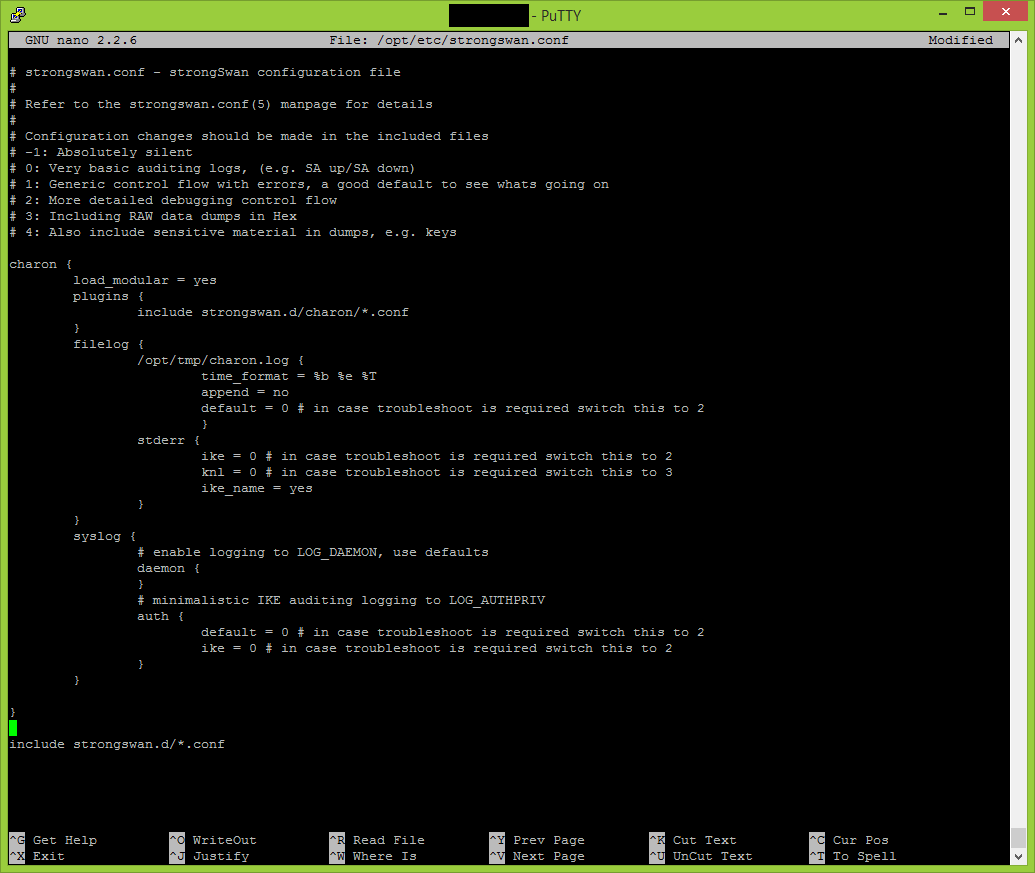
The following configuration is despite whatever type of Azure gateway we will use (static / dynamic). This configuration will allow you troubleshoot and open the necessary ports required for the VPN tunnel.
nano /opt/etc/strongswan.conf
# strongswan.conf - strongSwan configuration file
#
# Refer to the strongswan.conf(5) manpage for details
#
# Configuration changes should be made in the included files
# Verbosity levels
# -1: Absolutely silent
# 0: Very basic auditing logs, (e.g. SA up/SA down)
# 1: Generic control flow with errors, a good default to see whats going on
# 2: More detailed debugging control flow
# 3: Including RAW data dumps in Hex
# 4: Also include sensitive material in dumps, e.g. keys

charon {
        load_modular = yes
        plugins {
                include strongswan.d/charon/*.conf
        }
        filelog {
                /opt/tmp/charon.log {
                        time_format = %b %e %T
                        append = no
                        default = 0 # in case troubleshoot is required switch this to 2
                }
                stderr {
                        ike = 0 # in case troubleshoot is required switch this to 2
                        knl = 0 # in case troubleshoot is required switch this to 3
                        ike_name = yes
                }
        }
        syslog {
                # enable logging to LOG_DAEMON, use defaults
                daemon {
                }
                # minimalistic IKE auditing logging to LOG_AUTHPRIV
                auth {
                        default = 0 # in case troubleshoot is required switch this to 2
                        ike = 0 # in case troubleshoot is required switch this to 2
                }
        }
}

include strongswan.d/*.conf
Make sure you open the required VPN communication with your router.
iptables -t filter -A INPUT -p udp --dport 500 -j ACCEPT
iptables -t filter -A INPUT -p udp --dport 4500 -j ACCEPT
iptables -t filter -A INPUT -p esp -j ACCEPT
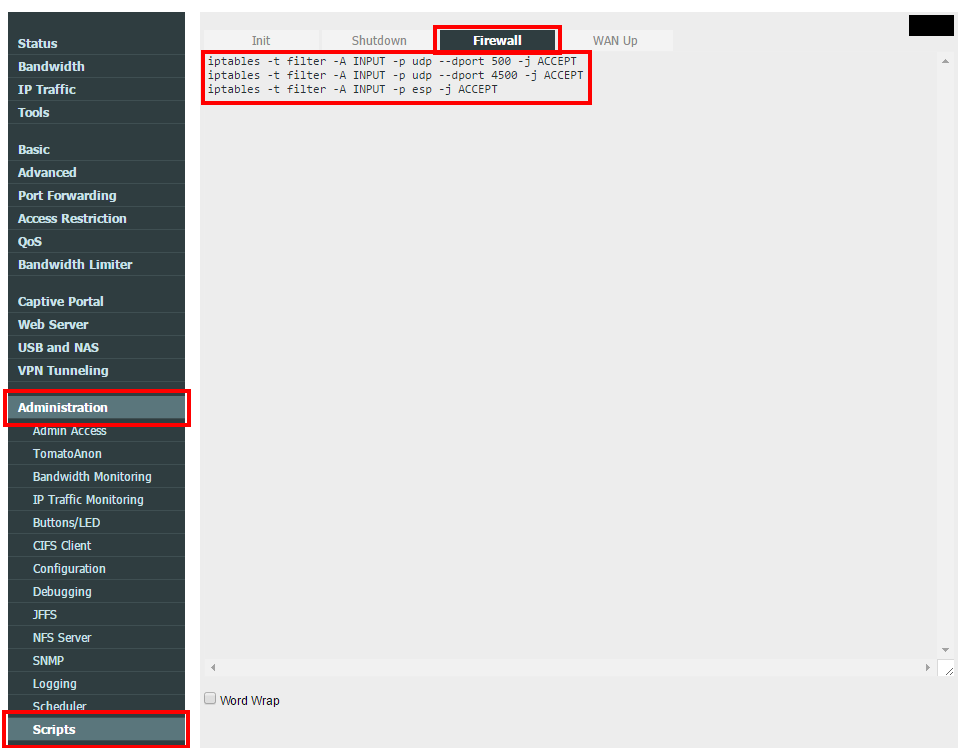
Reboot is required in order the firewall rules to apply.
Continue with On-Premises Site 2 Site VPN with Azure using Tomato Shibby Mod (Entware-ng and Strongswan setup) – part 2.
Just wanting to make it really clear to others that you need to format the usb stick utilizing fdisk. It’s stated above but the instructions aren’t really there. You need to create one large partition on the disk of the linux file type, google for instructions; it’s fairly easy.
I have followed your guide to the letter, but cannot seem to get Strongswan working.
Oct 2 15:08:21 00[LIB] loaded plugins: charon test-vectors ldap pkcs11 aes des blowfish rc2 sha2 sha1 md4 md5 random nonce x509 revocation constraints pubkey pkcs1 pkcs8 pgp dnskey sshkey pem openssl gcrypt fips-prf gmp gmpdh agent xcbc cmac hmac ctr ccm gcm curl mysql sqlite attr kernel-netlink resolve socket-default socket-dynamic farp stroke smp updown eap-identity eap-md5 eap-mschapv2 eap-radius xauth-generic xauth-eap dhcp whitelist led duplicheck addrblock unity
Oct 2 15:08:21 00[LIB] unable to load 8 plugin features (4 due to unmet dependencies)
Oct 2 15:08:21 00[JOB] spawning 16 worker threads
Oct 2 15:08:21 01[LIB] created thread 01 [24663]
Oct 2 15:08:21 01[JOB] started worker thread 01
Oct 2 15:08:21 02[LIB] created thread 02 [24668]
Oct 2 15:08:21 03[LIB] created thread 03 [24666]
Oct 2 15:08:21 05[LIB] created thread 05 [24670]
Oct 2 15:08:21 06[LIB] created thread 06 [24672]
Oct 2 15:08:21 07[LIB] created thread 07 [24667]
Oct 2 15:08:21 08[LIB] created thread 08 [24665]
Oct 2 15:08:21 04[LIB] created thread 04 [24664]
Oct 2 15:08:21 10[LIB] created thread 10 [24669]
Oct 2 15:08:21 09[LIB] created thread 09 [24671]
Oct 2 15:08:21 11[LIB] created thread 11 [24673]
Oct 2 15:08:21 02[JOB] started worker thread 02
Oct 2 15:08:21 12[LIB] created thread 12 [24676]
Oct 2 15:08:21 14[LIB] created thread 14 [24674]
Oct 2 15:08:21 13[LIB] created thread 13 [24675]
Oct 2 15:08:21 03[JOB] started worker thread 03
Oct 2 15:08:21 03[JOB] no events, waiting
Oct 2 15:08:21 01[JOB] watcher going to poll() 8 fds
Oct 2 15:08:21 15[LIB] created thread 15 [24678]
Oct 2 15:08:21 15[JOB] started worker thread 15
Oct 2 15:08:21 16[LIB] created thread 16 [24677]
Oct 2 15:08:21 05[JOB] started worker thread 05
Oct 2 15:08:21 05[NET] waiting for data on sockets
Oct 2 15:08:21 06[JOB] started worker thread 06
Oct 2 15:08:21 07[JOB] started worker thread 07
Oct 2 15:08:21 07[DMN] thread 7 received 11
Oct 2 15:08:21 07[LIB] dumping 0 stack frame addresses:
Oct 2 15:08:21 07[DMN] killing ourself, received critical signal
Please capture the output of the following commands and paste them here:
opkg update
opkg list
opkg list-installed
opkg list-upgradable
Note to all readers: I am not daily installing and setting up routers with entware-ng and strongswan. Please signal me (write a reply) if the installation is not matching anymore with the article. I will then flash again my router, figure out the changes and update this article.
Just a heads up, following your how-to the StrongSwan libipsec module (opkg install strongswan-mod-kernel-libipsec) is used to encrypt the traffic (even if not explicitly stated). According to StrongSwans documentation, this is a work-around and not recommended (https://wiki.strongswan.org/projects/strongswan/wiki/Kernel-libipsec), instead the proper way is to be using Linux builtin IPsec kernel modules. In Tomato they´re not precompiled, but have to be downloaded from Shibby (extras-archive) and loaded on boot. Maybe you should complete your howto with this recommended, however optional step? I have compared the performance with libipsec and Linux kernel, and IP-sec encryption is a bit faster with the latter. Other differences is that libipsec (your howto) creates a TUN.-device called ipsec0, while the Shibby modules integrates IP-sec SA’s in XFRM. Also libipsec forces the use of NAT-T (udp 4500) even if there is no actual NAT-situation occuring.